Ear hose clamps are easy to install due to their simple, user-friendly design. Below are several reasons why they are popular for both DIY projects and professional applications:
- Simple Design: The straightforward design with two “ears” allows for easy compression and adjustment, making it intuitive to use.
- No Special Tools Required: While pliers can be helpful, ear hose clamps can often be installed by hand, eliminating the need for specialized tools.
- Quick Compression: The ears can be easily squeezed together to tighten the clamp around the hose, allowing for fast adjustments.
- Flexible Positioning: The clamp can be repositioned along the hose before final tightening, offering flexibility during installation.
- Clear Visibility: The clamp’s position is visible, allowing for easy alignment with the hose and fitting.
- Reusable: Many ear clamps can be reused if undamaged during removal, making them convenient for repairs and adjustments.
These features contribute to the ease of use, making ear hose clamps a popular choice for securing hoses in automotive, plumbing, and industrial applications.
For any doubt & Query write us at: sales3@natronequipments.com
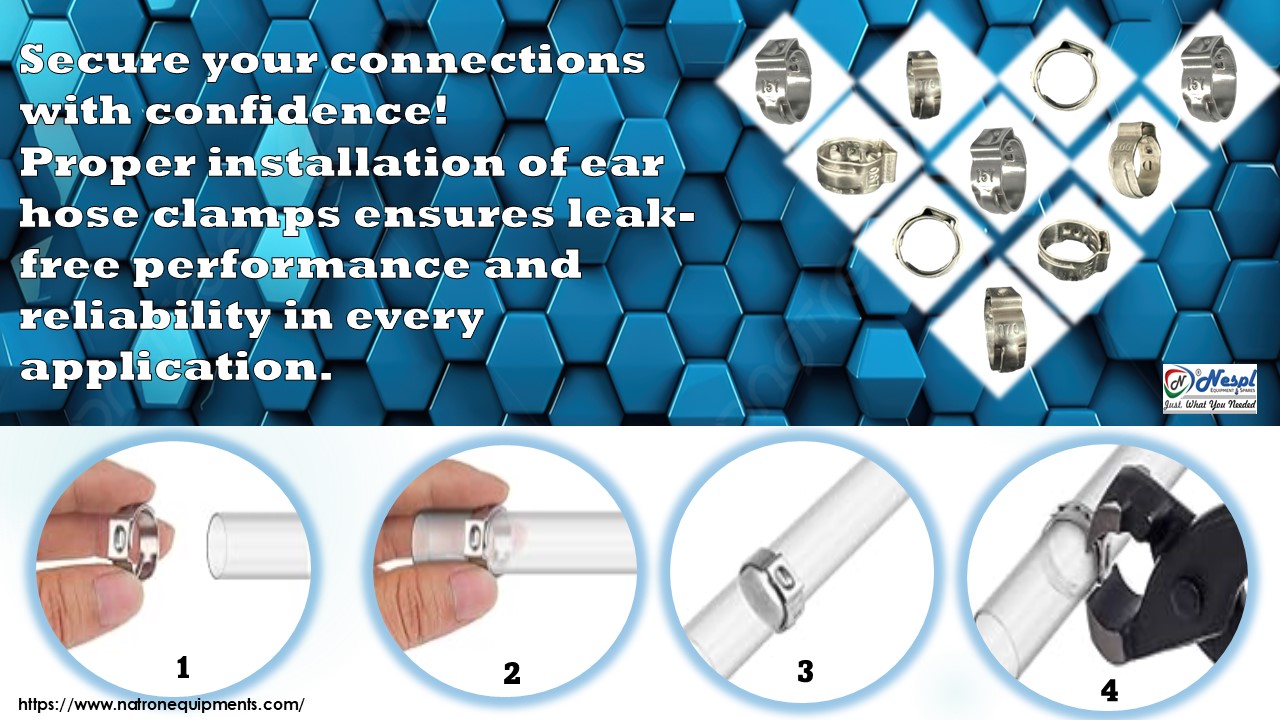
Step-by-Step Guide to Installing Ear Hose Clamps
Installing an ear hose clamp is a straightforward process. Follow these steps for a secure installation:
Tools Needed:
- Ear hose clamp
- Pliers (preferably needle-nose)
- (Optional) Lubricant for the hose
Installation Steps:
- Prepare the Hose and Fitting:
- Ensure the hose is cut to the correct length and is clean.
- If needed, apply a small amount of lubricant to the hose end to make the installation easier.
- Position the Hose:
- Slide the hose onto the fitting or connector, making sure it is pushed all the way in.
- Place the Clamp:
- Slide the ear hose clamp over the hose, positioning it about 1/8 to 1/4 inch from the end of the hose, ensuring it covers the fitting.
- Compress the Clamp:
- Using pliers, grasp the two “ears” of the clamp and squeeze them together to tighten the clamp around the hose.
- Adjust the Clamp:
- While squeezing the ears together, slide the clamp slightly down the hose until it’s securely positioned against the fitting.
- Release the Clamp:
- Once the clamp is in place, carefully release the pliers. The clamp should stay securely fastened around the hose.
- Check the Fit:
- Ensure the hose is snug against the fitting without gaps. The clamp should hold the hose firmly without pinching or damaging it.
- Final Inspection:
- Inspect the installation to make sure everything is secure and properly aligned.
Tips for Easier Installation:
- If the clamp feels loose after installation, you may need to adjust or replace it.
- If the clamp is hard to slide or adjust, applying a bit of lubricant can help ease the process.
Must visit to explore more: https://www.natronequipments.com/various-industry-products/nespl-clamps-and-tools
Conclusion
Installing ear hose clamps is a simple and efficient way to secure hoses in a variety of settings, including automotive, plumbing, and industrial applications. Their ease of installation, strong grip, and reusability make them a popular choice. By following this step-by-step guide and using the proper tools, you can ensure a secure and effective installation.
Must Visit to explore more: https://www.natronequipments.com/