Setting up and maintaining a kegging kit is essential for efficiently serving fresh beer in your brewery. This comprehensive guide will help you through the process, ensuring that your kegging system operates smoothly and that your beer is served at its best.
For any doubt & Query write us at: sales3@natronequipments.com
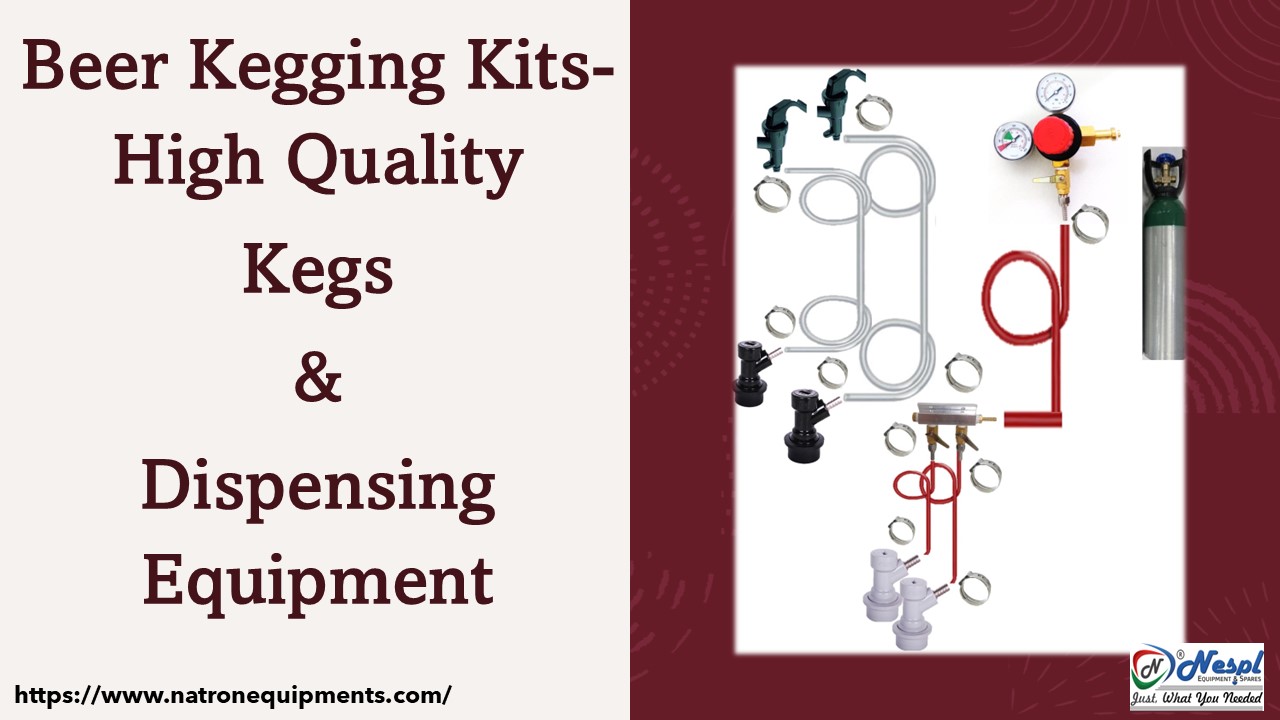
1. Establishing Your Kegging Kit
Assemble Your Equipment:
- Kegs: Choose from various styles, such as Corny kegs (homebrew standard) or commercial kegs.
- CO2 Tank: Typically, a 5 or 10-pound tank.
- Regulator: Controls the CO2 pressure.
- Beer Lines: Connect the keg to the tap or supply.
- Gas Lines: Link the CO2 tank to the keg.
- Keg Couplers: Tap the keg (specific to keg type).
- Faucet: Distributes the beer.
- Cleaning Equipment: Includes disinfectants, brushes, and maintenance solutions.
Wipe and Disinfect:
- Kegs: Clean and sanitize thoroughly before use or refilling to prevent contamination.
- Lines and Faucets: Use a beer line cleaning product to avoid off-flavors and infections.
2. Set Up the CO2 Tank and Regulator
Install the Regulator:
- Connect the regulator to the CO2 tank, ensuring it is tightened and leak-proof.
- Set the pressure to the appropriate level for your beer style, typically 10-12 psi.
Check for Leaks:
- Use soapy water to test for leaks around the CO2 connections.
3. Attach the Keg
Connect the Gas Line:
- Attach the gas line from the regulator to the keg’s gas inlet.
Connect the Beer Line:
- Attach the beer line from the keg to the faucet. Ensure all connections are secure.
4. Carbonate Your Beer (if needed)
Set the CO2 Pressure:
- Adjust to the recommended level based on your beer type.
Shake Method:
- For quicker carbonation, gently shake the keg while CO2 is being added. Allow the keg to rest and fully carbonate over a few days.
5. Distribute and Serve
Chill the Keg:
- Ensure the keg is properly chilled before dispensing to maintain the correct serving temperature.
Pouring:
- Open the faucet slowly to prevent excessive foaming.
Maintaining Your Kegging Kit
Regular Cleaning:
- Beer Lines: Clean every 1-2 weeks or after each keg change to prevent bacteria and off-flavors.
- Kegs: Rinse and sanitize thoroughly after each use before storage.
Inspect and Replace Parts:
- CO2 Tank: Regularly check levels and refill as needed. Inspect for damage.
- Regulator and Hoses: Check for wear or leaks and replace as necessary.
- Seals and Gaskets: Replace any that are cracked or leaking.
Proper Storage:
- Kegs: Store empty kegs clean and dry. For filled kegs, keep them in a cool, temperature-controlled environment.
- CO2 Tank: Store upright in a cool, well-ventilated area.
Monitor Pressure and Temperature:
- Beer Pressure: Regularly check and adjust CO2 pressure to maintain proper carbonation and avoid over-foaming.
- Serving Temperature: Keep the beer at the optimal temperature for the best taste and presentation.
Troubleshooting:
- Foaming Issues: Often caused by incorrect temperature, pressure, or dirty lines. Check and adjust as needed.
- Flat Beer: May indicate insufficient CO2 pressure or a leak. Ensure proper pressure and inspect for leaks.
Must Visit to explore more: https://www.natronequipments.com/beer-industry/Customized-Kegging-Kits
Conclusion
By following these steps, you can ensure that your kegging system operates efficiently and that your beer is served in excellent condition. Regular maintenance and proper setup will enhance your brewing and dispensing experience, ensuring that every pour is as perfect as the last.
If you’re looking for high-quality kegging kits and brewing equipment and spare parts, NESPL is here to help. We provide top-notch beer brewing solutions.
Contact us to learn more about our branded and high-quality products which can elevate your brewing operation and ensure the best quality beer for your personal consumption or customers.